For some users, attempting to connect with the Netflix program on a computer or mobile device produces the TVQ-ST-131 error message (they never make it past the login screen). This error code affects numerous platforms and is generally linked to a network connectivity issue that prevents your device from connecting to the Netflix service.
What Is Netflix Error Code TVQ-ST-131?
The most common Netflix error code TVQ-ST-131 is due to a network connection problem, which is a typical error code that further hinders a device’s ability to get connected to the Netflix service. When a user encounters a TVQ-ST-131 error code, they are notified of several things, including Netflix being unable to link, try again.

The Netflix Error Code TVQ-ST-131 is a condition that indicates the device is attempting to communicate to the Netflix server but something (such as a server down problem or any other bug) is preventing it from doing so.
Reasons: Why Does Netflix Error Code TVQ-ST-131 Occur?
There are several reasons why this Netflix error code might show up. Here’s a shortlist of possible causes for this issue.
-
Server Problem:
There was a problem with the server, which caused several users to be unable to access Netflix and other services. It’s possible that your server is down. If you experience something similar, the error problem is most likely with your server. You can’t do anything now but look for the server problem and can contact the Netflix help center to fix it since you have no control over it.
-
Ambiguous Netflix Account.
According to a number of reports, the Netflix app may falsely claim that the user account is active when it is not. This issue should be resolved by logging out and back in using your account.
-
Reboot Your Router.
This problem might be the result of a network issue. Your ISP may change your Dynamic IP, which is responsible for this problem. If you restart or reboot your router in this circumstance, the trouble should go away.
-
Poor DNS Range.
The majority of this error code message’s sources include poor DNS ranges. The default DNS range, which is likely to be the source of the problem, has been changed by many users in order to alleviate it.
-
Your Network Does Not Support Streaming.
It’s also possible that your network administrator or, more likely, your ISP is blocking you from connecting to Netflix. If this happens, you should contact the appropriate bodies for additional information.
How To Fix Netflix Error Code TVQ-ST-131?
By applying the mentioned below methods, you can easily fix the Netflix Error Code: TVQ-ST-131.
Method 1: Make Sure You Have Strong Internet Connection:

You must make sure your network can handle all high-definition streaming services. Try connecting to the internet on different devices with the same connection to see whether you have access. Maybe due to a problem with the shared internet connection, your access to streaming services has been restricted.
Method 2: Clear Up Netflix Cache:
![]()
The procedure for clearing the cache memory is comparable to that of resolving any other problem. First, log out of your Netflix account before shutting down your device. The cache will aid in setting a new preference on the device after it has been updated. After the restart, sign back into your Netflix account.
Method 3: Reboot And Reset Your Router:

If you’ve already ruled out a server problem, your next stop is a network fault. This sort of issue typically appears if your ISP (Internet Service Provider) gives you a Dynamic IP address from a pool that Netflix does not accept.
If your dynamic IP address is blacklisted by Netflix, the owner of the VPN account can prevent you from watching Netflix. If this occurs, there are two options:
-
Reboot Your Router
If you know what to look for, it’s not difficult to spot. This will result in your network device giving you a new IP address for the device where you’re streaming from Netflix.
The easiest approach to attempt forcing the creation of new TCP and IP data without having any long-term modifications to your router is through a captive portal.
Look on the back of your router to discover if there is a reset button. If so, press this button and wait for around 30 seconds before restarting your network device (On/Off button).
Disconnect the power cable from the wall and leave it for one minute to make sure that all of the electricity capacitors are discharged after you’ve been able to shut off the power.
After you’ve been able to reboot your router and regain Internet connectivity, wait until everything comes back online, then try signing in with Netflix one more time to check if the issue is fixed.
-
Reset Your Router
If the simplest restart technique fails, you’ll need to try a network reset.
If it seems like that the issue is caused by a setting on your router, you’ll need to reset your network device settings to their default state in order for it to be resolved.
You are free to reset your router’s configuration at any time, but consider this point, that all of your settings will be lost, including saved PPPoE passwords, whitelisted ports or protocols, and forwarded ports, among other things.
After the reset is completed, reconnect to the internet (if necessary), and replace the login credentials provided to you during your router’s initial setup to reconnect.
Finally, try watching Netflix material one more time to make sure if the procedure is completed.
If the same issue persists, go to the next possible solution below.
Method 4: Examine The Status Of Netflix Server:

Before you try any of the other solutions below, make sure that your Netflix service isn’t currently down and that you aren’t experiencing playback issues as a result of it.
Fortunately, you may quickly verify this by visiting Netflix’s official status page to see whether they’re currently reporting any problems.
If the status page of Netflix now shows a server problem, you may contact a support agent and inquire whether the current malfunction might have an impact on device streaming in your region.
Method 5: Sign-In Again With The Netflix:

In fact, the most typical reason for this condition on most devices where the TVQ-ST-131 error code appears is because you’ve lost your Netflix sign-up. What happens is that despite the fact that the program you’re using claims you’re signed in, you aren’t really logged in to your Netflix account.
This problem is increasingly prevalent among Smart TVs and mobile devices (iOS and Android).
Fortunately, there is a simple and quick remedy for this problem – all you have to do is sign out of your account before signing in again.
Yes, the process for doing so will differ depending on your device, but in most situations, you may log out of your Netflix account by going to your Account menu and selecting Sign out.
If you’re still having trouble, try signing out and back in again. Enter your login information when prompted, then resume streaming to see if the issue has been resolved.
If you’re still getting the same error code TVQ-ST-131, look at the next possible solution below.
Method 6: Change Your DNS:
If you’re receiving this error code on a PC, Xbox One, or PlayStation 4, there’s a good chance your DNS (Domain Name Address) isn’t working correctly.
Custom DNS servers had also been used by us, which was the source of recent issues. We have since changed our custom DNS to a more stable one. This issue has now been resolved completely for all users who switched over to a more stable DNS, and we urge you to do so as well.
Those impacted individuals that were previously dealing with the DNS issue have successfully managed to fix this error code by switching to the stable DNS.
In the majority of cases, the people who received this error code said that they were able to resolve it by changing their DNS settings to those given by Google.
The following are the steps to change the default DNS on your device:
-
Change Your DNS on Xbox One

- Select the Apps menu from the Xbox One home screen and then press the Xbox button on your controller to bring up the guide menu. Access the Settings menu from there.
- Select the Network option from the menu on the left side of your Xbox one console’s Settings page, then move over to the right column and select the Network Settings option.
- Select the Advanced Settings from the left-hand side menu of the Network menu.
- Select “Configure DNS” from the drop-down menu, then choose “Manual” from the next screen.
- Finally, update the primary and secondary DNS to the following settings.

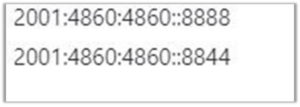
Please Note: If you want to utilize IPV6, replace the following addresses with these ones:

- To enforce this as your new preferred DNS, save the changes then restart the console. Once it has restarted, check if the error code has vanished.
-
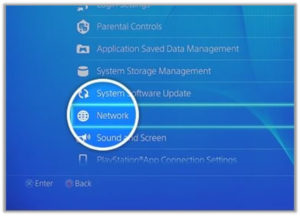
Change Your DNS on Playstation 4
- Select Settings by swiping upwards on the main dashboard of your PS4 system, then use the left-hand thumbstick to choose it. Finally, press X to enter this menu.
- Go to Settings > Network and select the Set Up Internet Connection option from the list of available options.
- Choose Custom from the next menu to have the option of creating a personalized DNS.
- To enable your console to set its own IP address, choose Automatically from the drop-down menu.
- Finally, under the DHCP Host Name option, select Do not Specify.
- Select Manual from the DNS Settings stage, then enter the following values for the Primary DNS and Secondary DNS

The following values must be used instead if you want to utilize the IPV6 protocol

- Save any modifications, then turn off and restart your console to see if the problem is gone.
-
Change Your DNS on PC
- By pressing Windows key + R, open the Run dialog box. Then type ‘ncpa.cpl’ and press Enter to launch the Network Connections window.
- Select the Wireless option from the left-hand menu. Select Wi-Fi (Wireless Network Connection) from the drop-down menu at the top of your screen and click on Properties from the right-click menu that appears. Instead, right-click on Ethernet (Local Area Connection).
- Ensure that the username and password are correct. Click Yes when prompted by the UAC (User Account Control).
- In the Ethernet or WiFi window, go to the Networking menu and select it. Select the This Connection Uses The Following Items option from the drop-down menu. Check the box for Internet Protocol Version 4 (TCP / IPv4) after clicking on the Properties button.
- Select the General tab. Enable the box for Use the following DNS server address if it isn’t already enabled.
- Change the Preferred DNS server and Alternate DNS server to the following settings on the next screen:

- If you’re connecting to the web through an IPv6-enabled connection, use the following settings instead for Internet Protocol Version 6
- At the computer’s next startup, save your modifications and enforce the new DNS to see if the error code TVQ-ST-131 is fixed.
Wrapping Up!
Most consumers today are familiar with Netflix and its services, such as streaming. People nowadays prefer to watch movies, web series, and animations on Netflix, and they buy Netflix memberships in order to do so.
The techniques described above will undoubtedly help you tackle the problem of having the Netflix Error Code TVQ-ST-131 with no access to Netflix.